- Knowledge Base Categories:
- School Accounting System
- Accounts Payable
FAQ: How do I add a signature to my purchase order format?
To add a signature to your custom purchase order format, complete the following:
- First, obtain the signature from the authorized person on a blank sheet of paper.
Tip: Use a black, fine-tip marker when obtaining the signature. - Scan the signature (be sure to crop as needed so that only the signature is captured and not the entire sheet of paper) and save the image as a .gif file.
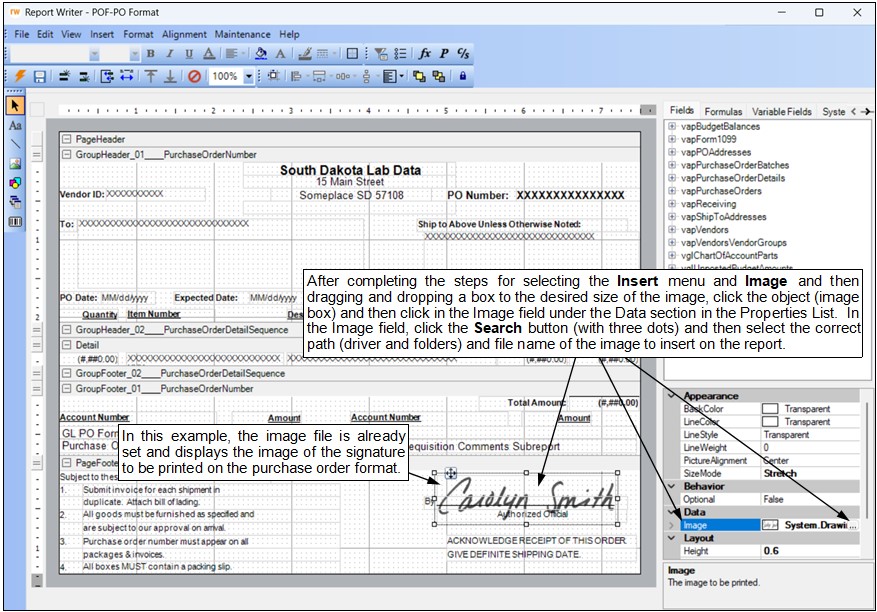
- From the Accounts Payable screen, select the Maintenance menu and then Purchase Order Format Setup.
- At the Purchase Order Format Setup screen, select the purchase order format to change and then click the Edit Record button.
- On the Edit Report screen, select the Insert menu and then Image.
- Click at the location within the desired section on the report for where to add the image, and drag and drop to the desired size of the image.
- A box for the image will appear in the designated section as an empty (blank) object.
- To select the image file to be inserted into the designated location:
- Click the object (image).
Tip: After an object is selected, handles (boxes) will appear around the outside edges of the selected object. - With the image selected, click in the Image field under the Data section in the Properties List (located in the lower right corner of the screen) and click the Search button (with three dots) to select the correct path (drive and folders) and file name of the image to insert on the report; then click the Open button.
- Click the object (image).
- Resize, format, move, and align the image as needed.
- Click the Save button.
- Click the X in the upper right-hand corner to close the Edit Report screen.
- If desired, click the Execute button to print the report from within the Purchase Order Format Setup option.